Thursday 11 December 2014
Editing
Today, me and my group are going to be editing our video. We planned to do this yesterday but it took a lot more time than we first anticipated. We used our time yesterday to import all of our clips into iMovie and Liam has also created our album cover so today is going to be used to put our video together ready for viewing tomorrow.
Friday 28 November 2014
Upcoming Filming Session

We are next planning to go and film next Tuesday, this is because all of us in the group are free and the weather report has given good weather which is what we have been waiting for. We are going into Liverpool Centre to film at the Pier Head so it is important that we have good weather for this shoot because it is outside in open space.
Artist Logo/Header
This lesson I used Photoshop to create our artists's logo/header that will be used on our poster and album cover. We have looked at DJ logos and headers and noticed that most of them are just the name of the DJ and they look mostly plain so I have created these two based on what we have seen from looking at similar artists.


Out of the two we have decided as a group to go with the bottom draft because we think that it is a lot better than the top and it stand out more because it is bold.
Contacting Revealed Recordings

This morning, I sent a message to Revealed Recordings to ask for their permission to use Hardwell's "Young Again" for our music video. I have done this because there are copyrights in place which means that we have to ask for permission for use of this song.
If Revealed reply I will post this on the blog at a later date.
Wednesday 26 November 2014
Filming Update
Today, me and my group were supposed to be going into Liverpool City Centre to continue our filming at the pier head. However, the weather today is not good as it is raining and it is very dull outside therefore meaning we have had to call filming off for today and reschedule for another day when the weather will be better.
Friday 21 November 2014
First Day of Filming
On Wednesday we went out for our first day of filming. Here are a few photos from whilst we were out on location in a local park. This was a successful shoot and we got some good clips for our video. We are going to go back out and film next Wednesday in Liverpool City Centre. These images were taken whilst filming sections that we are going to use in the first verse of our music video.


Wednesday 19 November 2014
Time Lapse Clips
Here are 2 more clips from when I was out in Liverpool tonight. I have used the same Ken Burns effect on these videos to get the best out of them. I went and filmed these clips based on our original idea of using time lapses throughout our music video.
This video was taken on the Dock Road in the middle of Liverpool.
This one is from Queen Square Bus Station.
I went out with one of my friends who is a photographer which gave me access to better equipment and I also had someone to discuss ideas with as I was not with my group on this particular day.
I went out with one of my friends who is a photographer which gave me access to better equipment and I also had someone to discuss ideas with as I was not with my group on this particular day.
iMovie Technique - Zoom In

To do this, open up your video in iMovie, highlight the video that you are using and click on the crop option above the preview.

Friday 14 November 2014
Photoshop Technique - Filters

 |
| Original Image |
 |
| Painted Effect |
This technique is very short because it does not involve layers like the others do, this is a very simple effect that can be done by just using filters. This particular filter that I have used has allowed me to make the original image look like it has been painted.
Wednesday 12 November 2014
Album Cover Analysis
Here are a few examples of album covers from different artists in different genres. Each have their similarities and differences in style, colour and content.

This is Amy Winehouse' "Back to Black" album cover. This was a massive album for this artist and is her most popular from her career. The album cover is very straight forward as it is simply a picture of the artist in front of a blackboard. I assume this has been done to represent the "Black" in the title. The font on the cover gives the artist and album name, this font has been created for this artist as it is unique and is not featured anywhere else.
Although this cover is simple, it manages to stand out and strongly represent the style of the artist.

This album cover is the newest Daft Punk album. This cover is again very basic and has the name of the album on the front in a signature style. This is something that we could possibly do for our artist using hand drawn images that we can scan and edit in Photoshop if we chose to go with this style. The main image is a divide of the two masks that the artists are known for wearing. This is likely why the name of the artist is not on the cover because it is instantly recognisable by the target audience of the album.

This is the "I Am Hardwell" album from Hardwell. Because I know this artist and this album I know that the space theme of the album comes from the name of the songs in it such as "Spaceman" and "Apollo". The album follows a space theme throughout so the cover has represented this well. The cover also features an image of the artist, the artist name and the album name. I like this album because it represents the music of the artist which is unique and fans of the artist will recognise this theme as a style of the artist and his music.

Finally, this is one of the most famous album covers created. This is Pink Floyd's "Dark Side of the Moon" album. This was the third best selling album of all time and this has also become one of the most famous album covers created. This is very different to the other covers I have mentioned because it has no text on the cover so there is no artist or album name advertised.
I have read about this album cover online through different forums and websites from other people's views on it. One of the views I read gave the idea that the use of the spectrum of light sown that the band is well educated, but can also be contorted to show a view of life. This idea says that life starts off straight and then everything changes (Represented by the refraction of light).
Other people think that it could possibly represent love or government. This could have been the idea of the cover all along, to get people thinking about what it could mean.
These are the sources that I got this information from:
Filming Locations
Today, I was in Liverpool City Centre. While I was there I took some photographs of different locations that I think that my group could use for filming our music video at. Liverpool is an iconic city with a lot of recognisable scenery that I think would allow us to create a very unique video.
These photos have been taken around the dock areas of Liverpool. These are the more famous parts of the city and have been done up over the past couple of years so everywhere looks modern with the old buildings keeping the heritage of the city. I think that the mix of new and old scenery will highlight the lyrics of "Young Again" by showing the different generations of the city in the same place.
 |
| This is the Pier Head. |
 |
| This is outside the new slavery museum. |
 |
| This is the Albert Dock. |
 |
| This is along the waterfront. |
 |
| This is near the Echo Arena/Liverpool Eye. |
 |
| This is the dock area of Liverpool. |
Tuesday 11 November 2014
GoPro Filming
For our project we are looking at borrowing a GoPro camera from one of our friends. We are doing this because a GoPro camera will give us a lot of flexibility with the style of our video. A GoPro is a waterproof camera which is often used for action sports but because of the mounts that are available for the cameras it will be very easy to shoot first person footage with.
Liam came up with the idea of trying to get hold of a mount to hold the camera to my wakeboard to see what footage we can get from me riding and seeing whether this would be a suitable idea to use in our video. I have looked at GoPro wakeboarding clips on YouTube to look for filming ideas and to see what it looks like using different angles and I am going to see what I will be able to do with it next time I go riding.

This is a short video of wakeboarding footage filmed on a GoPro. This video shows first person shots which we would be able to use once we get hold of the camera. It also shows the quality that we will be able to film in which I think is very suitable for our music video.
Liam came up with the idea of trying to get hold of a mount to hold the camera to my wakeboard to see what footage we can get from me riding and seeing whether this would be a suitable idea to use in our video. I have looked at GoPro wakeboarding clips on YouTube to look for filming ideas and to see what it looks like using different angles and I am going to see what I will be able to do with it next time I go riding.

We have chosen to use this type of camera because they can film in 720p and full 1080p. There is also a GoPro app that we will be able to use which will allow us to control the camera and also stream the videos straight to our phones which will make clips much easier to sort out and edit. They also have waterproof housings with them which will allow us to take the water shots that we want.
This is a short video of wakeboarding footage filmed on a GoPro. This video shows first person shots which we would be able to use once we get hold of the camera. It also shows the quality that we will be able to film in which I think is very suitable for our music video.
Thursday 6 November 2014
Photoshop Technique - Flaming Text


In our lesson yesterday, we were taught another Photoshop technique which was to format text to look as though it is on fire. Above are print screens of the PowerPoint that I created whilst I was creating the flaming text and it is a step by step guide to explain how I created this effect. We are learning various Photoshop techniques so that we have a wider range of options when it comes to creating our posters and album covers. Although this effect looks good, I do not think this is something that my group would use because it does not really fit in to the genre of dance music. However, the same technique can be used on images so this is something that we could experiment with to see if we could make it work. I will try to create my own flaming image to see what sort of style I can expect to find from it and try to make it fit into our chosen style.
Tuesday 4 November 2014
Mood Board

This is a mood board that I have created for the genre of dance music. I have created this to represent the styles and events that can be seen within this genre. This mood board features a range of genres and logos that fans of this genre would recognise, but acts as a model of the genre to people that are not too aware of what it is like.
I have created this mood board because the song that we have chosen comes from this genre so this will give my group's audience an idea of the sort of styles to expect from our music video and will hopefully give reason to some of the choices made in filming ideas and locations used.
Friday 24 October 2014
Pixel Burst
I gave the pixel burst technique another go because I thought that it looked over-edited. I tried it again with a plain background and tried to give more of a fade on the burst and think that my second result looks better. I am going to have another go at this with one of my own images that I will later upload and compare to my previous attempts.
Group Blog Update
We not have our full group back and we have discussed what we are going to do next in the stages of research and preparation for our video. We have decided that we are definitely going to use the song "Young Again" by Hardwell because it is Hardwell's leading song for his new album, we cannot yet find figures for this because it has not yet been officially released.
This is Young Again:
We have chosen this song because me and Jacob have a strong interest in dance music which Liam did not share, so this song is a bit more mellow and has more lyrics than a conventional dance track. The three of us have agreed on this song and have started looking into different ideas for clips and filming methods.
Wednesday 22 October 2014
Photoshop Technique - Pixel Burst
This is a series of print screens from today's lesson where I was taught how to create a pixel burst effect onto an image. In order to complete the effect, you repeat the last 4 steps to each other layer and experiment until you are happy with the result. In each layer you use scatter brushes to make it look like pixels are being blown out of the picture giving off the effect. Once I had learnt the main stages of this I tried to create my own. My result is below:

Monday 20 October 2014
Filming Ideas
Over the weekend, me and Liam discussed different ideas to what we can do for filming in our music video. As we have access to waterproof equipment we have decided to experiment with filming underwater to see what we can get from it.
We are going to look at what we can do with this method to see whether it will have a place in our video as we do not yet know what our main style is going to be based around. We have already looked at time lapsing and are also thinking of including slow motion clips during different parts of the song so we are going to see what these styles will look like when we put them together because we want to make sure that it will all fit together before we set about filming.
We are going to look at what we can do with this method to see whether it will have a place in our video as we do not yet know what our main style is going to be based around. We have already looked at time lapsing and are also thinking of including slow motion clips during different parts of the song so we are going to see what these styles will look like when we put them together because we want to make sure that it will all fit together before we set about filming.
This is a video from when I went to Michigan. This is filmed underwater in Lake Michigan using my waterproof phone case, this is something that we may use at some point during our video.
Friday 17 October 2014
Group Blog
Today in lesson, Jacob was not in however me and Liam have set up our group blog which is going to be where our research will be put up. We will post on that blog about our progress and ideas that we develop as we make our way through the year heading towards the production of our music video.
In our next group meeting we are going to look at the styles of the genre of dance in more detail and we are going to look at a range of music videos, posters and album covers that all fall under this genre. We will analyse and compare the material so that we can create our own ideas for our own products that will be unique but still strongly fit in with the genre of dance.
Last night I decided to practice a different style of filming that we could potentially use in our music video, this is a time lapse of a journey home that I have produced. I think that because of the style of music and the varying speeds of the songs that this could be used effectively in our music video so this was a tester to see if it is a simple enough idea to include in our video.
Tuesday 14 October 2014
Style Choices - Hardwell
Today in lesson we created a diagram which split our ideas up into more detail so that we can make a more informed decision on what song we will be doing for our music video. This is our diagram with the choices that me and Liam have come up with. Jacob is not in today but I managed to get in touch with him to get his thoughts and suggestions.
I wrote down the dance music ideas and have come up with the suggestion to do "Young Again" by Hardwell, this is because this song has good lyrics in it and sounds like a crossover genre where we could get some good ideas together to make a video.


This is an example of a poster for a Hardwell tour poster. It is a cartoon version of Hardwell with his name and tour dates and locations on. The colours and style used has made it look like there are strobe lights behind the artist which I thought was good because at live performances you expect to see a lot of lighting used so it all fits in with the genre of dance music.

This is an album cover for Hardwell, it features a picture of the artist and artist name but the background has a lot to do with space. This is in relevance to the names of the songs on this album such as "Spaceman" and "Apollo" which relate to the theme of space so this album is a representation of this.

This is the music video for "Apollo" by Hardwell, the video does not have much to do with the lyrics but I found that the video was very simple and there are parts of the video that relate to the theme of space which is where the video has relevance to the album that it is from.
This is a video from Hardwell's set at Tomorrowland 2014, this is the sort of environment that you would expect to see from this style of performance. It is a very loud genre that uses a lot of strobe lighting and pyrotechnics which makes it a very bright genre. In this video there are a lot of good examples of filming techniques such as crane shots, long shots, close ups, handheld, zoom in and zoom out.
Hardwell is a DJ from the Netherlands and was the number 1 DJ of 2013. He found his love for music at the age of 8 and at age 13 began remixing popular songs at the time. He is currently a progressive house DJ and producer, he broke his way into this scene back in 2009 with his Bootleg remix of "Show Me Love vs Be". Since this he has produced his own material such as "Spaceman" and "Apollo" and made collaborations and toured with Tiesto. In his earlier years when he performed live, he was too young to get into the clubs where he played so he would have to be escorted by his parents. He is now 24 and often headlines major events around the world and is considered one of the world's best DJs.
Hardwell now hosts his own radio show which is now also a podcast which is aired every friday night called "Hardwell On Air". His music is sold online through iTunes and Beatport, however a lot of downloads are often free and he makes his living through ticket sales from live performances and festival appearances.
Friday 10 October 2014
First Group Ideas

Wednesday 8 October 2014
Green Screen
I have updated my green screen video from last year's attempt. I have done this in front of a green screen this time instead of a white screen which is better and I have used iMovie to insert an introduction title and credits at the end of my video.
This is my lip sync draft for this year. I had issues inserting an image to the green screen so I am going to research tips on how to solve this problem and update this video with an image behind me.
Tuesday 7 October 2014
Lip Sync Feedback

These are the notes that I took whilst members of my class presented their lip sync videos. I have not yet got a completed lip sync video so this is my task to do now. I am going to lip sync a song and I will include titles, credits and I will use either an image or a video instead of having a green screen behind me.
Update
Unfortunately, due to technical difficulties at home I have not had access to the internet outside of school to produce any blog posts. So that I do not fall too far behind I am going to make use of the Mac suites in sixth form to complete my coursework and upload it to my blog.
Sunday 5 October 2014
Photoshop Practice - Wakeboarding
As well as using Photoshop for coursework, I use it a lot for personal projects mostly based around the sports that I do. In my spare time I have been practicing using Photoshop to enhance images to get better quality from them and to make them stand out more. This is an example of a before and after that I have produced:
 This is the original picture.
 This is the picture once I had finished editing.
To produce this photograph, I used image adjustment controls to change the exposure, contrast, brightness and saturation levels. This allowed me to brighten the image and bring out broader colour to make the image really stand out. I will likely use similar techniques when I create a poster for my music video with the same idea in mind to brighten it up and make it stand out more to attract the attention of my target audience.

This is another technique that I have learnt through my use of Photoshop which is to layer images on top of each other but lining them up to create a series shot. This is something that I may not have to use for this particular project. However, I have the skills ready for if I need to do this or if my group decide that we want to produce something of a similar style.
To produce this photograph, I used image adjustment controls to change the exposure, contrast, brightness and saturation levels. This allowed me to brighten the image and bring out broader colour to make the image really stand out. I will likely use similar techniques when I create a poster for my music video with the same idea in mind to brighten it up and make it stand out more to attract the attention of my target audience.
This is another technique that I have learnt through my use of Photoshop which is to layer images on top of each other but lining them up to create a series shot. This is something that I may not have to use for this particular project. However, I have the skills ready for if I need to do this or if my group decide that we want to produce something of a similar style.
Friday 3 October 2014
Further Green Screen
Today in lesson I was shown further editing skills in iMovie. Here is the example that I have created to show how to include titles, credits and audio over a video that has been created using a green screen technique.

This print screen shows how you would insert a title to a video by selecting the "T" at the bottom right of the screen. You then select the option that you feel is appropriate and then drag the box to where about you want to insert the title. I have chosen to put it at the start of my video as an introduction.
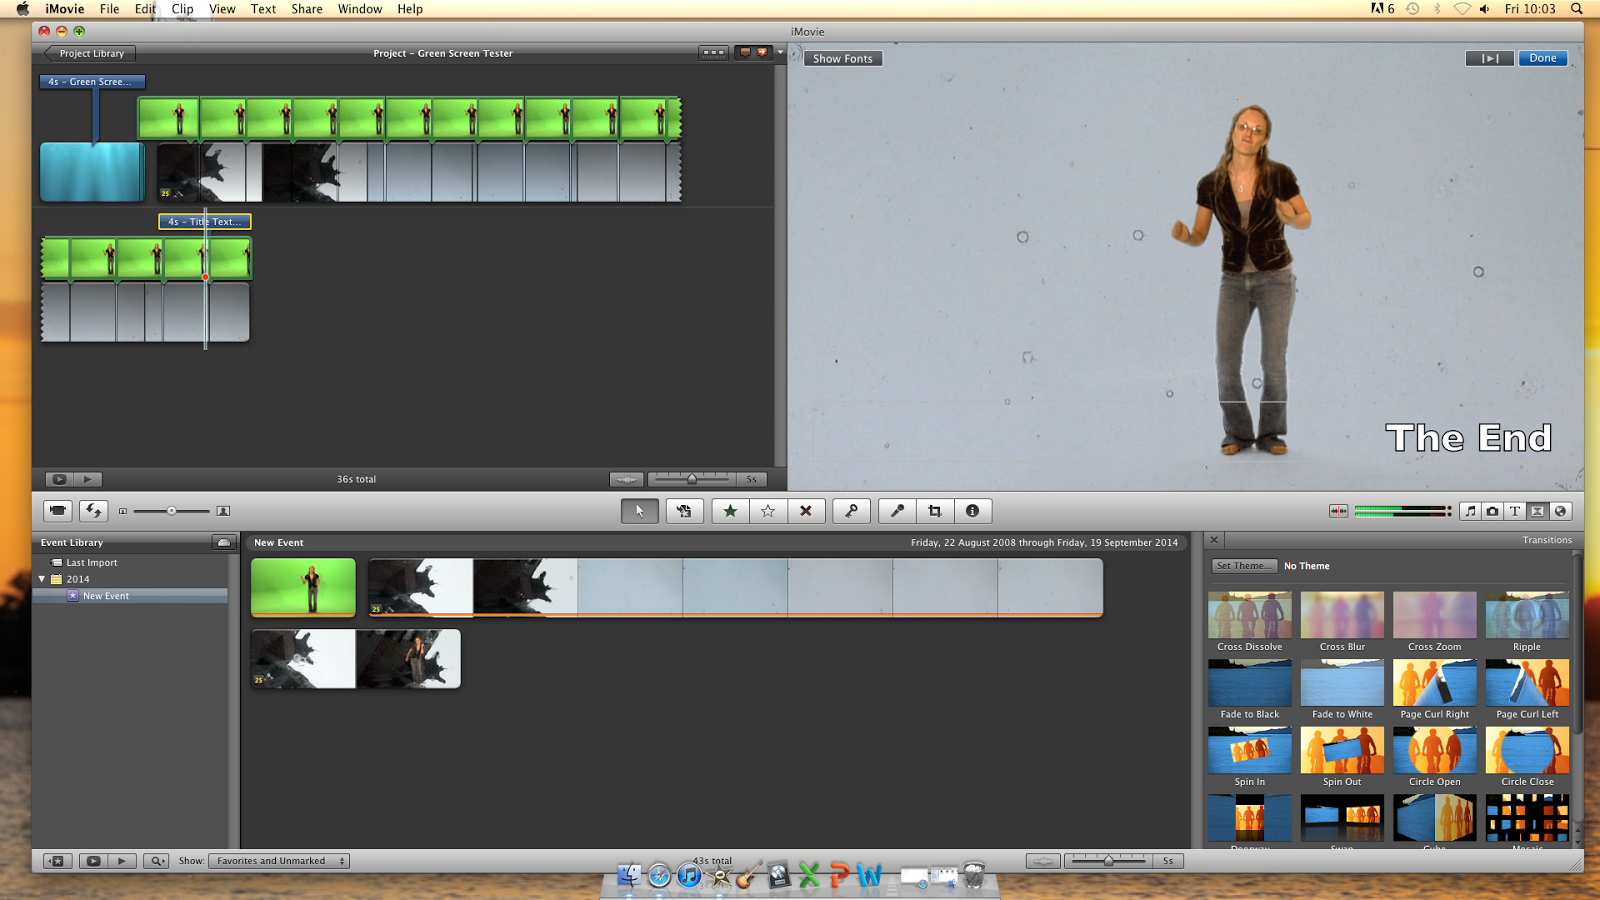
You can also insert transitions between clips on iMovie by selecting the transitions tool by the title tool which will allow you to add transitions to fade between clips to keep an even flow going throughout.

To add audio you select the musical note next to the title button and then go through samples or iTunes libraries to find audio that you want to import. You then drag the audio over the video and it will then play over the top.

Subscribe to:
Posts (Atom)